Tuesday, 27 November 2012

Grow Your Own Curry

MsMarmiteLover's aubergine curry
Think of curries, whether an Indian dhansak or jalfrezi, or a hot and sour Thai jungle curry, or a Malaysian laksa rich with aromatic flavours, and we think of exotic ingredients. A curry made with all-purpose curry powder will never taste as good as a bespoke curry in an authentic Indian restaurant. Ready-made pastes for specific dishes – like a Mussaman, or a Tikka Masala – are convenient but to me at any rate they all taste rather too alike to be seriously credible.

Before I grew my own curry ingredients, I knew that on the occasions when I’d planned ahead and bought fresh ingredients to make my own curry powders and pastes that the resulting dishes were streets ahead. But there are ingredients that are very difficult to get hold of, even here in London where we’re lucky enough to have food shops of the world on our doorsteps. So you leave out the curry leaves, or the kaffir lime leaves, or the holy basil and the curry still tastes great, but is missing something.

Ingredients like lemon grass, ginger, turmeric, cumin, etc, are invariably imported and so by the time they reach even a high turnover oriental supermarket they will have lost a significant amount of freshness. But what many people don’t know is that it’s perfectly possible to grow many of these supposedly exotic ingredients here in the UK, here on your patio.

Make a curry from ingredients you have grown yourself, that can come straight out of the ground into your pestle and mortar and the flavours will sing out loud. No longer will the curry be simply hot with a vaguely warm spicy taste, it will be aromatic and you’ll taste all the sweet-sour, hot, salty, mustardy, clovey, aniseedy flavours as they should be.

There’s a convenience factor as well. I have cobbled together a Thai green curry paste from scratch, added coconut cream from the store cupboard, some rice plus whatever was lurking at the bottom of the fridge and made a fantastic fresh curry in less than half an hour, no shopping needed. It takes a bit longer than using a packaged paste, but it’s much nicer and much more satisfying.

Let’s start though with some core ingredients of any spice paste. Onions and garlic form the basis of many curry and curry pastes and these are two ingredients that grow very happily here in the garden.

Onions

Onion sets can be planted out either in autumn or spring. The advantage of planting onions in autumn is that they will get a head start in spring next year as soon as the weather warms up and you should be lifting your onions to eat in May. There should be just enough time to plant overwintering onions now, but don't leave it any later. We planted Senshyu onions in the Secret Garden, a type specifically bred for autumn planting, spacing the onions evenly and planting them just deep enough to leave the tips slightly exposed above the soil - not too much top showing or else they will be dug up again by birds who appear to enjoy tossing freshly planted onions around the garden.

In the summer we ran a workshop on companion planting – the beneficial effects of positioning certain plants close to each other. Onions and garlic are well-known companion plants – the onion smell and garlic smell are said to deter some insect pests. Onions are good for repelling carrot fly - the onion odour masks the smell of carrots - while garlic is good to plant under roses as the smell deters greenfly.

Garlic

Now is the optimum time to plant garlic. We would always recommend a UK-bred variety such as Solent Wight for best results here. Check the weather forecast and aim to plant just before a cold snap: garlic cloves like to be chilled after planting to stimulate growth. Separate the garlic bulb into individual cloves and push each one into the ground, closing the soil over the tip so they are covered.


Fennel

Another spice ingredient suitable for growing outdoors is fennel. Fennel seeds are an integral part of a number of spice mixes and this herb fennel (this isn’t the type that grows a swollen bulb at the base) produces edible leaves, edible flowerheads and then of course, after flowering, the seeds. These seeds are mature right now - try biting into a fresh fennel seed and see how pungent the flavour is. 

There’s one other thing I like about growing hot chillies, ginger, turmeric and so on. There’s something a bit subversive about it. You’re not supposed to be able to grow these plants here in Britain, which makes it all the more fun to try and all the more fun when you get a half-decent crop.

Chillies

Chillies are a great example of a plant that is ridiculously easy to grow. I’ve been raising chilli plants for 10 years now, and I can’t remember the last time I bought a chilli pepper in the shops. There’s something incredibly satisfying – almost addictive - about growing chillies.

Not only are they easy to grow, but they mature into extremely attractive plants laden with fruit. In the Secret Garden we've grown Jalapenos, which are piquant and which are also traditionally smoked to make the Mexican chipotle sauce, and also the miniature Basket Of Fire variety, which we picked and used in the curries served at the Grow Your Own Curry afternoon. Basket of Fire is a very hot, birds-eye style chilli – ideal for Chinese, Thai or Vietnamese dishes.
      

Ginger

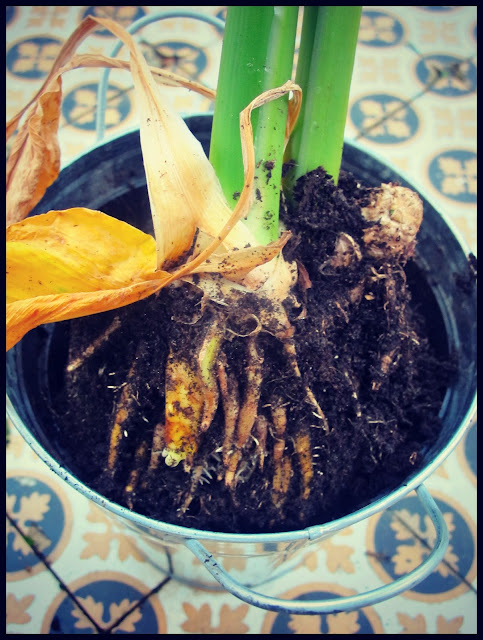
Ginger is a tropical plant, but it’s perfectly possible to grow ginger in a pot, indoors, in a conservatory or on a sunny windowsill. First you will need to find a piece of ginger root with small yellow nodules (see picture) protruding from it - these will develop into shoots. You may have to hunt around in your local mini-market and greengrocers to find suitable roots for planting.

home grown ginger, The Secret Garden ClubPlant up in rich moist compost and keep the soil moist, but not wet. Keep temperature as constant as possible: bright windowsill against a double-glazed window is good, heated conservatory is good. They prefer not to be in direct sunlight. Anything above 20 degrees is workable, above 25 degrees better. The root will take up to a month to sprout but will then grow quickly throughout the summer before dying back at the beginning of autumn - anytime from October is a good time to harvest. Do not expect to become self-sufficient in ginger unless you have a lot of pots.
There's a step-by-step guide to how we grew our ginger plants here.


Turmeric

home grown turmeric, The Secret Garden Club
Growing turmeric in the UK is very similar to ginger: you need to plant a piece of rhizome with a nodule on it that looks as though it might sprout. However, turmeric will withstand slightly lower temperatures than ginger – down to around 18 degrees Celsius is OK, and also its leaves are edible and can be used for flavouring.

However, don’t imagine that you can just snap off a leaf and start chewing on it. The leaves tend to be used either in the same way as banana leaves, for wrapping food in, or ground up into a paste, or pickled. Or the leaves are picked and soaked to get some of the sourness out of them – then the soaking water is used in the recipe and the leaves thrown away.


The picture here shows part of the fresh root which can be cut from the plant and used fresh, or dried and then ground into powder.

Curry Leaves


home grown curry leaves, The Secret Garden Club


Pictured above is a Murraya koenigii, or curry leaf tree and it’s one of those times when Latin or botanical names comes in handy because this is a very different plant to the curry plant which you find on sale in garden centres all over the country.

Murraya koenigii is the plant whose leaves are used throughout Indian and Malaysian cooking, usually quickly fried in oil and then added to a curry as a finish or garnish.

I find fresh curry leaves practically impossible to find over here, and dried ones seem to me to have lost much of their flavour. They do freeze well, but again, I don’t have much luck finding even the frozen versions.

So instead I have my little curry tree. And it is very little –this is a young plant and in its natural habitat it will grow into a full-sized tree, over 10ft tall. 

I bought this plant from Plants4Presents and they’re also sold in the UK by Poyntzfield Nursery up in Scotland. The two things to remember about keeping a curry leaf tree happy is that 1) they’re not frost hardy so you will need to grow them in a pot, outdoors in summer, indoors in winter; 2) in their natural habitat they grow on the forest floor, so don’t put them out in the sun. Put them under a tree.

Lemon grass

home grown lemon grass, The Secret Garden Club

Lemon grass is well worth growing in the UK – even outside. Once established, the plants will grow vigorously, giving you fragrant leaves for flavouring, for making herbal teas, or scenting your bath. It will also grow offshoots, which the close-up photo here shows clearly at the base of the plant, which you can use as the classic lemon grass stalk in Thai curry pastes.

There are three ways you can get a lemon grass plant going. You can buy seeds fairly readily from garden centres and nurseries. Sow these in a seed tray in February and keep warm – cover with clear plastic lid or polythene bag until the seeds have germinated. When the seedlings are big enough they can go into a big pot, a number of smaller pots, or, once the danger of frost is over, outside in a sunny sheltered spot in lots of good rich compost.

The second way is to find some very fresh-looking stalks either in the supermarket or more likely an Asian supermarket. Trim the stalks lightly then sit them in water – stuffed into the neck of a cleaned-out Coke bottle or a plastic water bottle that supports the stalks is a good idea. Change the water daily and you should see white roots begin to appear. The time taken for the stalks to develop roots varies enormously: it can be a few days, or it can be several weeks. 

Thirdly, you can divide your own established plants once they’ve developed side-shoots. Instead of using all the side-shoots for cooking, select some for removing from the mother-plant and planting up separately.

By September you will need to harvest your lemon grass – any that isn’t used at the time can be sliced and put in the freezer, where they will keep very well.

Otherwise, bring your pots of lemon grass in over winter. They will not survive temperatures of less than 5 degrees. Give them a haircut, trimming them down to about six inches, then continue to water them sparingly, just enough to prevent them from drying out, and they should come back to life in the spring.

One other point to be aware of, if you have cats, is that the cats love lemon grass. Mine regularly likes to sit on the kitchen table and chew away at the leaves. Not great if you’re planning to harvest them later.

Kaffir Lime

The kaffir lime is a member of the citrus family which produces highly fragrant leaves used in Thai cooking, and also knobbly-shaped limes with, again, highly fragrant zest. I’ve had a Kaffir lime bush for five or six years now and while it isn't very prolific in terms of producing fruit, it earns its keep by giving me a hassle-free supply of Kaffir lime leaves 365 days of the year. I find fresh leaves practically impossible to find in the shops, and the dried versions have lost much of their flavour.

Citrus trees have quite a precise set of requirements to keep them healthy. If you’re able, either by luck or design, to provide a suitable environment for a citrus tree then it will appear to need very little maintenance. If your conditions aren’t ideal then they’ll prove troublesome.

In summer, in the UK, they’ll like to be outdoors, somewhere sunny and sheltered. A south-facing patio is ideal.  They don’t however like frost or wet winters so you will need to bring your tree indoors in winter. They do, however, like to be kept cool in winter, somewhere between 7 and 13 degrees. I move mine to an unheated loft bathroom under the skylight – it’s not too cold because of all the heat coming up from the floors below and it’s nice and bright with the big skylight window. If you have a light, bright conservatory that’s ideal so long as you don’t turn the heating up in winter.

In summer, keep the soil moist; in winter keep it dry and water very sparingly. However, it may well be worth standing the citrus pot in a tray of gravel which you keep wet, to raise the overall humidity around the plant – they do tend to find the air in our centrally heated houses very dry. (Another reason why the unheated bathroom works well.)

We’re doing a citrus workshop next month with lemons, limes, oranges, and kumquats when we’ll go into specific detail. However, I usually say that if your citrus looks happy: plant looking perky, leaves nice and glossy, then it is happy. A characteristic of any citrus plant that is struggling, whether too wet, too dry, too hot or too cold, is that all its leaves will fall off. A bald plant is one that is in trouble.


Coriander

Coriander can be grown both for its leaves - and roots and stems, which are often used in Thai dishes - and also for its seeds, which are commonly used in spice mixes and powders. 

When growing for its leaves, I find I get the best results by sowing the seeds thickly in a seed tray, keeping the tray warm and harvesting as microleaves - snipping off the leaves when the seedlinsg are just a couple of inches high. 


Growing for seed is almost easier as coriander is a notorious 'bolter' - the plants often to seed. Simply collect the seeds as soon as they turn brown on the plant and let them finish drying on a plate in the kitchen before storing in an airtight jar. 

You may often see what looks like coriander referred to as cilantro. I used to think it was simply that cilantro was the American word, but since I’ve started growing it as well as eating it I keep coming across cilantro in a British context. I have seen it suggested that coriander is grown for seed and cilantro for leaf but also that coriander refers to the whole plant: roots, stem (which are also edible and much used in Thai cooking) and all, while cilantro is the leaf only.

Thai basil

Until about six weeks ago I would have been recommending these wholeheartedly as the kind of herb which is not only easy to grow but also impossible to buy in the shops. Then my local Waitrose started stocking it in the fresh cut herbs sections. Thai basil is the variety that gives Thai curries that sweet licorice scent, and ordinary basil leaves just don’t work the same way. It’s incredibly easy to grow Thai basil in a pot on a sunny windowsill and one medium-sized pot will keep you in basil all summer long.

I grow lots of different types of basil, all in the same way. Get a medium pot with drainage holes and fill it full of good compost – multipurpose will do but it needs to be fine rather than rough-cut. Water it well. Sprinkle the seed over the surface – be generous, but keep the seed in a single layer. Cover very lightly with a layer of fine compost, so that the seed are just covered. If you’re sowing before April, cover the pot either with a fitted cloche, or a clear polythene bag stretched over the lip of the pot. April or after, you can leave the pot uncovered.

Put the pot in your sunniest windowsill: basil likes lots of light. The seeds should germinate by the end of a week – just three or four days at the height of summer – and once they’re through you can remove the polythene covering.

Keep them growing on the windowsill and start cutting when the leaves are big enough. Try to snip leaves from all over the pot: if you completely denude one seedling down to a bare stalk it won’t grow any more leaves. But if you pinch out the leaves at the very tip of the plant it will regrow quite happily. Water regularly to keep the compost moist and your pot should last all summer. Thai basil will start producing purple flower buds which can be snipped out and used as well as a garnish and flavouring.

After much experimentation I have come to the conclusion that here in the Uk, basil is an indoor plant. Outdoors, they fall prey too easily to aphids (greenfly), they get watered too irregularly and blown about in the wind. A warm sunny windowsill with still air and not so much temperature fluctuation will give you much more succulent leaves.

Holy basil

Often confused with Thai basil, this has smaller, more rounded leaves which are a matt green (or flushed with red, if it’s holy red basil) and slightly hairy. It looks frankly a more nondescript plant than the striking Thai basil. The flavour of the leaves is spicier, hotter, less sweet. Holy basil is also associated with Thai cooking, in stir fries, stews and rice dishes.

You can grow holy basil in exactly the same way as any other basil, but I’ve found it less prolific than the other basils and slower to grow.

Fenugreek


Like coriander you can grow fenugreek, or methi, for the leaves or seeds, both of which will give your dishes a distinctive mustard flavour and aroma. You can grow fenugreek from the seeds you buy in the supermarket. You can grow as separate plants or, a better solution at this time of year, is to grow as microleaves (pictured, left). Soak the seeds for about eight hours or overnight in clean cold water, then spread them evenly over a seed tray filled with compost. Cover the seeds very lightly with compost, and place a clear lid or polythene bag over the seed tray. Place somewhere light, bright and warm and the seeds should germinate in just two to three days.

There are two distinct types of fenugreek. The more common large-seeded variety has white flowers, and can only be cut once so once you've harvested, you'll need to sow some more. The smaller seeded variety has slightly smaller leaves, yellow flowers and will regrow after cutting.

If you're growing to raise single plants to maturity, soak the seeds first as above, then sow directly in a well-drained sunny spot. Sow the seeds thinly and just cover with soil, any time between April and August. Fenugreek will survive a light frost so is worth sowing sowing successionally throughout the growing season.


Cumin

There’s no reason why you can’t grow your own cumin plant in a sunny sheltered spot in the garden or in a patio container, or on a windowsill if you have the space. It’s an umbellifer, so related to caraway, fennel, and also carrots and parsnips. However, most of the world’s cumin is grown in the Middle East – it prefers daytime temperature consistently in the mid-20s Celsius.

If you’re going to try them outside, sow the seed indoors and keep warm until the seeds germinate. Once the seedlings are large enough to handle, transplant to pots, about three to four seedlings per pot. These can be then be kept indoors to grow on, moved outdoors once all danger of frost is past (say, late April), or the plants can be transferred to an outside border. Then pray for a long hot summer.

Simpler is to sow the cumin seeds directly in the large pot you plan to raise them in. Sow indoors as above, thin the seedlings once they have all germinated and decide whether to keep it indoors or move it outside depending on how the weather pans out. Last summer, for example, they would have stayed in.

It’s an attractive plant with feathery leaves, but you will be growing it for the seeds – another reason for needing a long season. The flowers are white (sometimes pink), after flowering you should see the seeds form. Pick them off the plant when they turn yellowy in colour and let them dry somewhere sunny – on a plate in the kitchen, say – until they go brown. Then they’re ready to be stored in a clean airtight jar and used as you would use the shop-bought version. Cumin seeds mature at different rates – there won’t be one single day when you can go and harvest all the seeds – so you will need to keep an eye on the plants and pick off the seeds as and when and add them to the kitchen plate.

I think it would be going some to grow enough cumin to become self-sufficient, but you should get enough for a few special occasion meals.


Fancy a challenge?

The plants listed above are all relatively easy to grow, whether indoors or outdoors, and should give you a decent harvest in favourable conditions. The spices and aromatics listed below present far more of a challenge - often because even if you managed to raise a tropical plant in the UK climate, you would have to wait many years for the plant to mature and produce its edible seed. It's not too surprising, therefore, that spices have been so highly prized and priced throughout history.

Cinnamon

Cinnamon is grown mainly for its bark, though its leaves are used in curries as well. It has been a much-prized spice for hundreds of years - there is a fascinating history of the trade in cinnamon here . 
You won't be able to grow cinnamon for its bark in the UK, but you could grow it in a pot in a conservatory and use leaves in teas and curries.
To use as a garnish, try growing cinnamon basil – a basil variety whose leaves have a definite cinnamon aroma. This can be grown exactly as Thai or ordinary basil.

Cardamom

Cardamom is a tropical rainforest plant. Best place would be a steamy bathroom, or an indoor heated swimming pool, should you have one. Kew Gardens has some advice on growing cardamom plants here, and Plants4Presents currently has plants for sale.

Don’t sow the culinary seeds that you buy in the shops, as they’re harvested unripe and then dried for kitchen use. 

Saffron

Saffron is extracted from the stamens of the saffron crocus. It's a painstaking process which must be done by hand, which is why saffron has traditionally been one of the most expensive spices in the world. I have tried growing crocuses for saffron, with dismal results, but there is a good online guide at Nurseries Online here. You plant in the summer and harvest saffron from the stamens of the flowers in autumn. You’ll need a pair of tweezers and it’s very fiddly.

Star anise

In theory, growing star anise, which is native to China, would be perfectly possible as a pot plant, indoors in winter, outdoors in summer. If only I could find one - and if anyone knows of a star anise plant supplier in the UK, please tell me! 

The star anise likes acid soil – it’s distantly related to magnolia – and lots of water. Once you get the plant established, it could be up to 10 years or more before it bears flowers and fruit – the star anise itself is the dried egg-shaped fruit in the star-shaped casing. The star anise ‘flowers’ that you buy here have been picked when immature and unripe and then dried, so you can’t reconstitute the seeds and grow the plant from there, unfortunately: the seeds are undeveloped and empty.

Peppercorns

The peppercorn vine is native to India and grows happily in Vietnam, but temperatures here, even in a greenhouse, are just too low. Peppercorns are the fruit of the vine, which are dried and can then be further treated. Black pepper, for example is cooked and dried peppercorns; green pepper is dried unripe fruit and white pepper is made up of dried ripe seeds. Pink peppercorns, however, are from a different plant: the Peruvian pepper tree, Schinus molle, or its relative the Brazilian pepper tree, Schinus terebinthifolius.

Although conventional pepper can’t be grown here, you can always try Szechuan pepper, which is comparatively easy - see Mark Diacono's guide in his book A Taste of the Unexpected.

Szechuan pepper is botanically related to citrus plants rather than pepper vines, but it will still give you a hot peppery hit along with some more complex citrus notes as well. It’s hardy in the cold and so long as you plant two of them (a male plant and a female plant), they will supply with you fruits – the Szechuan peppers – for a good few years.

Cloves

Originally from the Indonesian spice islands, cloves like it hot and humid. In its natural habitat a clove seed will develop it a full-grown tree up to 12 metres tall and spreading eight metres; it's next to impossible to recreate the conditions it likes in the UK outside a very large heated glasshouse. Bear in mind also that what is sold in the shops is a dried flower bud, not a seed, so cannot be planted, and that it takes 20 years for the trees to start producing flower buds.

Nutmeg

See cloves, above, for the optimal growing conditions, although they are speedy developers in comparison since the first nutmegs, the seeds of the tree, will be produced about 7-9 years after planting.

General tips for growing spice plants

  • These will tend to be tropical plants; by default in the UK they will have to come indoors in winter;        
  • Many also tend to grow in rainforest conditions; they don’t necessarily need lots of hot sun, but moist warm shade;
  • Plants which grow on the forest floor are used to lots of organic matter but not necessarily very fertile soil;
  • Don’t assume that a plant with edible seeds will have other edible parts, eg, cumin. (Although it might have, eg, turmeric);
  • Choose whether to try to grow your plant from seed – may be cheaper and more obtainable, or whether to buy a plant to nurture – may be the only viable way to acquire;
  • When searching the Internet for cultivation advice, check whether the site is referring to the UK, US, Australia or indeed anywhere else. You’ll find sites telling you how easy it is to grow cinnamon or talking about the benefits of growing lemon grass as hedging, and then find they are talking about Louisiana and Brisbane respectively.
zia mays, The Secret Garden Club
The Secret Garden Club's ginger harvest 


Guests were able to take away a selection of  seeds, a handful of overwintering onions and chillies picked fresh from the plant, to try raising their own spice plants.

Sunday, 4 November 2012

Mixed nuts

The Secret Garden's new hazelnut tree
When you're thinking of edibles to grow in the garden or allotment, it's easy to forget about nuts. But nut trees are easy to grow once established and hugely rewarding at harvest time in the autumn. Fresh nuts from the tree are a very different prospect to the older, drier nuts you buy in the shops.

Nuts are a tricky prospect for the urban garden, however. You will need space, ideally for more than one tree, since nut trees are not, on the whole, self-fertile. You will also need an anti-squirrel plan, but beyond that, nut trees need little in the way of maintenance and looking after.

The four main species grown in the UK - and mostly in the south of the UK - are hazelnuts (cobnuts), walnuts, sweet chestnuts and almonds.

Hazelnuts/cobnuts

Hazelnut trees grow well in southern England – traditionally they were grown on a commercial scale in Kent among the hops. This is why the hazels mostly grown in the UK are a variety of Kentish cob, where they will thrive in any type of soil, except that which is waterlogged.

They may not be at their best in a small urban garden, but you can decide if it's worth giving hazelnuts a go.


To pollinate successfully, ie, to get a good crop of nuts, you need at least two different types of hazel tree. Hazels are self-sterile: they may have both male and female flowers on each tree, but flowers from the same tree won't pollinate each other. They need a tree nearby of a different variety of hazelnut. Before you decide to buy 2-3 trees, check your neighbourhood. If there are hazel trees in the next garden, or the next after that, the chances are that it will wind-pollinate your tree quite satisfactorily.

To plant a nut tree, choose a site either in the sun, or brightly-lit part-shade, where the soil will drain well. Dig a hole that will fit your roots and base comfortably, water well, drop your sapling in and replace the soil, firming the surface. These days, experts often recommend that you don't add any manure or fertiliser to the planting hole or the soil: you want the tree to send down strong roots in search of nourishment, not loll around in the luxury of its original planting hollow.


A stake is always a good idea even if it’s only temporary until the tree sends down strong roots and establishes itself. Use a soft tie to tether your tree to the stake, so that wire or twine doesn’t cut into the bark of the tree as it grows – an ideal soft tie is a leg cut away from an old pair of tights!


Clear the area underneath the tree – the drip canopy – of any grass, or weeds and mulch it thoroughly with organic matter and/or composted bark. This helps to suppress weeds which might compete with the tree for nutrients, and will also help to retain moisture. 


Hazelnuts are picked when they are still fresh and green, from August through to October. They are usually eaten straightaway, when the nut is still relatively green and juicy. If you leave the nut until the shell goes brown, the nut will be drier in texture, but fuller in flavour. Hazelnuts store well up to Christmas if you keep them somewhere cool and dry.


The squirrel problem
Squirrels are probably most closely identified with hazelnuts but they are a problem for all nut growers, since they will eat or make away with as many nuts as possible. In a setting with plenty of space, you can minimise the problem by planting your nut tree away from woodland, leaving about 100m between the nuts and other trees. That's not possible in the Secret Garden and unlikely to be a viable solution in most urban gardens. 

What is possible is to take a sheet of pliable aluminium 1m in width and tack it around the tree at about eye level here just as the nuts are forming. This should stop squirrels from climbing the tree although you will need to make sure they can’t jump from another tree to your hazel. Remove the aluminium after you’ve harvested.


Nut weevils can also be a problem. You’ll know if you have nut weevils because you’ll have nuts with a tiny, perfect circular hole bored into each one – and the nut will have been eaten.

Nut weevils can be controlled or eliminated if you cultivate the ground underneath the tree. Digging, raking, weeding, will disturb the weevils. Alternatively if you have chickens you can let them loose under the tree and their scratching will have the same effect – Bunny Guinness recommends this as an anti-weevil measure.

Even if the squirrels do bag most of your harvest a hazel tree is still worth growing. They are quick-growing and pretty with the catkins emerging in early spring. Their straight branches are traditionally used as canes and plant support – cut them down in winter and store somewhere cool and dry. They can also be trained into arches and other decorative forms and are often used as hedging.

But if you think your garden isn’t suitable for a hazelnut tree – too small, too many trees, too many squirrels – you can still enjoy fresh-picked cobnuts in season as they are one of the easiest foods to find when foraging. Get out into your local commons, hedgerows and woodlands, and look for hazelnut trees.

Sweet chestnuts
For me, these are the best nuts for foraging. We lived near sweet chestnut woods when I was a child and I can well remember the excitement of the sweet chestnut season, picking over the windfalls. 

If you don't live near wild sweet chestnuts, a bought sweet chestnut sapling should produce nuts for you in 2-3 years. There’s nothing to say you can’t grow a nut tree from seed, so long as you bear in mind that: 1) you can’t guarantee that it will grow true, 2) you can’t guarantee it will be a healthy specimen, and 3) it will take years (10 for a walnut, up to 20 for a sweet chestnut) before it bears nuts. Make sure you still want to be living in the same house by then or else you will only bequeath a nut tree to the next owners.

Take care when buying a sweet chestnut tree in the UK. Recently a fungal disease affecting sweet chestnuts has ravaged trees in France and isolated cases have been reported in the UK. Make sure you buy your tree from a reputable supplier and that the tree is guaranteed fungus free. Some suppliers, eg Mammoth, have actually suspended supplies of sweet chestnuts until they can guarantee that their stock is free of the fungus.

Having found your reputable supplier, choose a self-fertile variety, unless you live in a stately home with its own parklands and have the space to plant more than one tree. Varieties such as Regal and Marigoule are both self-fertile, not too huge (Regal will grow to 15 feet in 10 years) and will give you nuts in 2-4 years.

Once you’ve overcome these hurdles, chosen your variety and the right location in your garden, the sweet chestnut will give you few problems. Squirrels like them – of course – and the same prevention methods with hazelnuts will work with chestnuts.

Walnuts
There is something very aspirational about a walnut tree. I once tried to persuade my husband we should move out of London to a house in Hampshire – solely because it had a mature walnut tree in the garden. I actually don’t remember anything about the house.

The mature trees are beautiful in a stately, elegant way – a lovely, spreading shape with intensely green, oval leaves. They are slow to grow and establish - and in the wild, slow to fruit (about 10-15 years) - so there is something of permanence and history about them.

And then of course they produce walnuts. And the difference between the walnuts you buy the shops, whether dried up and brown-shelled or ready-shelled, and the nuts that fall off your tree, is a revelation. Wet walnuts, with the shell still soft and undeveloped, can be pickled, but once the green husks fall from the tree and split to reveal the shell, the nut inside is moist and rich and creamy.

So, you want to plant a walnut tree? You’ll need two of them, at least. Walnuts tend not to be very self-fertile and will crop much better if there is another walnut tree of a different variety nearby (and of course, you’ll get more walnuts).

Chose a named cultivar, and plant as for other nut trees. Keep well watered as the tree establishes itself and gradually reduce this as it grows – walnut tree roots can rot. When the tree crops, wear gloves – the outer husks will stain your hands indelibly. I speak from experience having spent a week in Spain with black hands after I filled my pockets with wet walnuts – I think I thought I was going to pickle them back at the villa.

Walnut trees have another interesting characteristic: their roots exude a chemical which deters other plants from growing near it – so, easy weeding. I also wonder if this has anything to do with the traditional saying that you don’t get flies under a walnut tree. If the chemical deters more than plants as it were. Certainly walnut trees are not much affected by pests. There is such a thing as walnut blight, a bacterial disease which makes black spots develop on the leaves and can also affect the crop. Apart from that, it’s the old enemy, squirrels, which you need to guard against.

Almonds
Almonds like warm dry summers and frost-free winters to do their best, so they are a tree that does best in the south-east – like walnuts, in fact. In London the clay soil and consequent poor drainage is likely to be your biggest problem.

Almonds come from the same plant family as peaches and nectarines – think of the kernel of a peach/nectarine with that distinctive bitter almond taste. So the growing conditions are very similar.

If you want to grow an almond tree, you’ll need deep, free draining soil. Dig in lots of organic matter prior to planting and if you have a slope in your garden or allotment, plant near the top, not at the bottom. You also want somewhere in full sun or as close to it as possible. Buy a sapling, either as a bare root plant or in a pot, rather than trying to grow from seed, and you should have nuts in the second or third year.

The best way to harvest almonds is to lay a big sheet underneath the tree and then shake the branches hard to make the fruit fall out and on to the sheet. Let them dry for a few days before you start to eat them.

As they are related to peaches , they attract the same pests: in this case, leaf curl is the most likely problem you’ll get. Keeping the plants dry in late winter and early spring is one way to help prevent this fungal disease; using a copper fungicide in January/February is also effective.

Monday, 22 October 2012

Harvest - the highs (and lows) of the season


This wasn't the easiest year to create a kitchen garden: a warm spell in March brought many plants to life, only to be soaked by the wettest April on record, followed by a equally rainy June and with temperatures below normal. In the Secret Garden, we struggled with globe artichokes, which we hope will finally produce some fruit next year, and our heritage potatoes, although tasty, were very low yielding. We raised some good sweet peppers, but the jalapeno plants never really got going; our tomatoes succumbed to blight.

Even in the worst of years, you can count some successes. Elsewhere on this blog we have already documented how happy we were with a bumper crop of Mexican tomatillos, and on Sunday, our Secret Garden Club session concentrated on harvesting those crops which have come good in this mellow autumn.

Pumpkins and squash
Spaghetti squash, ready to be picked.
We raised our squash this year following the 'Three Sisters' planting methods of the Native Americans. There's more detail about the Three Sisters here, but the general idea is that sweetcorn, squash and climbing beans are grown together, the beans providing anchorage for the corn, which provides the beans with a climbing frame. The squash ramble at ground level, providing cover which suppresses weeds and keeps the soil moist underneath.

The squash plants didn't give us a glut, but we harvested good-sized spaghetti squash, Connecticut Old Field, the Italian Berrettina Piacentina with its dense orange flesh and chestnutty flavour, and Futsu, a compact Japanese variety. The courgettes were planted elsewhere in the garden and gave us a steady of not particularly prolific supply (it's not often you can say that: usually one courgette plant is not enough, and any more than one is a glut).

Courgettes and squash seeds should be sown indoors in pots: two seeds to a pot and then the weaker seedling thinned out once they’ve germinated. Once they have true leaves, they’re ready to be moved outside to be hardened off, ie, the plants are allowed to become gradually accustomed to the colder, windier air outside. Then they can be transplanted to the open ground. They like a rich soil so if you have manure or, better still, fully composted kitchen waste, dig that in before you plant out the squash. They do have a tendency to ramble all over the garden – if you don’t have the space for this, you can train them up a fence or trellis. The stems of pumpkins and squash are remarkably strong and will bear even very large fruits without them falling.

If you have a particularly rampant squash plant, nip out the growing tip after it has produced 3-4 fruits, then it can concentrate on growing these fruits to a decent size, instead of lots of little ones at the stem which probably won’t make it to maturity in our - comparatively - short season. Rest fruits on a tile to prevent damage by damp, slugs, woodlice, etc. Courgettes should be picked regularly, otherwise they will grow into giant marrows and the plant will stop growing more courgettes while it’s putting all its energies into the marrow.

Squash should be lifted before the first frost. You can tell they are ready by tapping near the stalk – you should hear a hollow sound. Try to keep a long stalk attached to the plant when you pick them  and store somewhere warm, dry and light to finish ripening before you eat them. If you eat them immediately after picking, they will taste very green and raw, particularly the orange-fleshed varieties. The flavour won’t sweeten and deepen until they have ‘cured’ for 6-8 weeks. Check them regularly as some store better than others – I have kept squash for up to eight months before eating them.

Borlotti and other beans
We sowed climbing borlotti beans in May as part of our Three Sisters plan, and harvested a small but tasty crop last month. Most of the plants managed to entwine themselves around the corn stems satisfactorily, although several made for the fig tree and climbed up that instead.

Borlotti beans do well here in London, the bean pods are spectacularly beautiful, as are the beans themselves. The fresh bean pods are bright crimson, housing creamy beans splashed with purple. There’s no reason why you shouldn’t pick borlotti bean pods to cook and eat fresh. They’re delicious, especially served with a squeeze of lemon, some salt and a drizzle of olive oil.

But leave at least some on the plants to keep for use later in the year. As summer wears on into autumn, the pods will change from bright pink flecked with cream, to a dark purple papery husk.

Pick the pods once they’ve turned dark and dry, but before the first frost, usually sometime in October. Thread the pods together and hang them up somewhere airy until all the pods are dried out. Then shell the beans. They should be dry already and clatter when dropped on the work surface. If they land with a soft thud instead, they need more drying.

Finally, freeze the shelled beans in a bag for about 48 hours - this quick freeze just ensures that if the beans were harbouring any bugs, mites or insect eggs, they are killed off.

Once out of the freezer, spread the beans out briefly on kitchen paper just to check they’re dry again, then pour into a jar with a tightly fitting lid.

Keep in a dark cool place and they will last for months – until your next bean harvest, in fact, if you haven’t eaten them all by then.

Beans, whether you grow them for green beans or to dry the mature beans for use in the winter, are a fast crop. They don’t like the cold and should be sown when the soil warms up in April or even May. They will catch up very quickly.

You can buy seeds for dwarf bushy plants or climbing plants. While the bushy plants are less work – you can reach all the beans easily when harvesting and you don’t have to build a frame for them to climb up – the climbing plants are better croppers. You’ll get much better yields and beans over a longer period of time from a climbing plant.

Like squash, beans like to be fed well. Before planting, choose the spot where you want to grow your beans and mix lots of kitchen compost into the ground. If you don’t have kitchen compost, use commercial compost and feed such as seaweed extract.


Figs
Figs are surprisingly easy to grow here in the south of England. In fact, trees can become very vigorous, but you will see many spreading leafy trees with very little fruit on them.

The trick to making your fig tree bear fruit is to restrict its roots. Find a sunny sheltered site for your newly-bought fig tree, and plant it in a pot sunk into the ground, or line the planting hole with stones, so that the roots are contained and you get a bushier tree with more fruit. Our summer season isn’t really long enough for a full crop of figs. When the frosts come, remove any immature fruit left on the tree. It is the very tiny pea-sized fruit which will develop into mature fruit the next year.
Brown turkey figs harvested in London.
Once your fig tree grows multiple branches, you can prune it in spring, removing any old, dead, crossing branches so that the tree is nice and open.

Cavolo nero
This is also called Tuscan kale, or Black kale, and has become very fashionable in recent years. By fashionable, I mean that not only will you find it on the menu in Clerkenwell restaurants, but also that you can buy it in Waitrose for about £3.99 for a few stems.

This implies that 'cavolo nero' is surely imported specially from Italy, where it is best grown, but in fact cavolo nero is simply a form of kale (a member of the brassica family), and grows extremely well right here as you can see. It’s also highly decorative, with these distinctive indigo leaves, and so the plant looks good in a mixed border.

Cavolo nero is best started off as seed in modules in April or May and left to germinate indoors or in a greenhouse. Once the seedlings develop their true leaves they can be hardened off – like the pumpkins and squash they need get used gradually to being outdoors after being indoors. The cold nights, winds, rain, and strong sun will all be terrible shock to the system of a seedling that has been in a warm settled, windless spot all its life.

When you transplant cavolo nero, space the seedlings about eight inches to a foot apart. They will need protection against slugs and snails – in the Secret Garden Club we use home-made copper rings, made with copper tape and sections cut from plastic water bottles. This is extremely effective – slugs and snails won’t cross copper. And it’s better than using pellets.

Brassicas are also vulnerable to whitefly – you’ll see clouds of them like tiny snowflakes whenever you disturb the plant. They’re not terribly damaging, but it’s not nice when you get your leaves home and you’re rinsing them off at the sink. We’ve had good results this year with planting marigolds around the cavolo nero plants – the marigolds exude a chemical which repels whitefly and it’s worked very well.

Apart from this, birds, especially pigeons, like the leaves. Consider throwing a net over the cavolo nero if they’re a problem. Garden plants shouldn’t be so affected since there’s usually a relatively high cat population keeping birds off the veg, but on an allotment site you may have to net your brassicas.

Once you’ve protected against whitefly, slugs and birds, your cavolo nero should grow very happily. It will need watering in a drought and when the seedlings are turning into full-grown plants, but from seeds sown in April, you should be eating cavolo nero from August, throughout winter and into February-March the next year. Worth a little bit of care and attention.

Blueberries
We planted our first blueberry plants in the Secret Garden just a week ago in anticipation of harvesting our first fruits next July. We have four 'Goldtraube' blueberry plants, which have a reputation for being heavy croppers and highly flavoursome.

Blueberries need an acid soil (lower than pH5.5) and our London clay on its own isn't nearly acid enough. So each plant occupies its own 30cm pot, and each pot is sunk into the soil so that the tops are at ground level. Sinking the pots reduces water loss, which is helpful since blueberries like plenty of water. A yearly topping up of ericaceous (acidic) compost keeps them fed, and I also like to spread the shredded needles from the Christmas tree around the foot of the plants as a slightly acidic, weed-suppressing mulch in January.


Jerusalem artichokes
I always think Jerusalem artichokes are great plants for anyone growing vegetables for the first time, so long as they like Jerusalem artichokes, anyway. If you do like them, and you’re not too bothered by the after-effects – not for nothing are they known as 'fartichokes' in our house - then they’re a rewarding crop to grow.

For a start, they’re indestructible. Not noticeably bothered by pests. They’re reliable: dig up the plant and there, underneath, will be the artichokes. They also pass the shop test: they’re not widely available in supermarkets and they’re stupidly expensive when they are. They are bountiful: a dozen tubers planted in March-April will begin producing artichokes to feed you in November/December all the way through the winter and into the early spring.
Finally, they’re economical: you only need to buy artichoke tubers once. The following year, select 8-12 nice plump tubers from the current crop and plant these in March-April to provide the next year’s crop.

The only care notes I can really think of are 1) when the seedlings emerge you might want to look out for slugs and snails. As soon as they produce their true leaves which are tougher, the slugs lose interest, but at the very beginning the growth might be slow if your plot is very sluggy. And 2) round about August-September, the plants will grow very tall and may even flower – and when they do you’ll see that they are related to sunflowers. However, if they’re flowering, they’re expending energy on producing flowers rather than fat tubers, so it’s a good idea to cut the plant down as we have here, otherwise high winds can blow them over and anyway you don’t want them putting on top growth any more.

And if you do like them, they’re very versatile in the kitchen. They make a lovely creamy soup; I always make a Jerusalem artichoke gratin as part of Christmas lunch; you can roast them under the Sunday joint like roast potatoes and they also make tasty chips. You can whizz them up with aromatics to make a kind of Jerusalem artichoke houmus, you can use them to make JA pancakes – like a potato pancake – and I’ve also had them raw, shaved very finely in a salad.


Wednesday, 3 October 2012

Tomatillos - Mexican fruits in a London garden

One of our most successful crops this year in the Secret Garden was the tomatillos. We grew them last year specifically for MsMarmiteLover's Frida Kahlo dinner and we liked them so much that we planted again this year.

These are tomatillos: tall spreading plants that need support, and these are the fruits themselves, looking like green tomatoes in a papery husk. If they remind you of physalis (Cape Gooseberries) that's because they are closely related. Tomatillos are also cousins of potatoes, tomatoes and so also of aubergines - all members of Solanaceae. (If you grow potatoes you may have noticed that the potato plants sometimes produce small green berries that look similar to a tomatillo. Don't be tempted to try them: potato berries are poisonous - as indeed is the entire plant, apart from the tubers).

We're particularly pleased that the tomatillos have done well this year because it was such a poor year in general for them. Tomatillos like warmth and sunshine - they are really a subtropical plant and the fruit is typically used in Mexican cooking. Our climate in north London is far from Mexican. If you read the books or online, many people say that they should really be raised in a greenhouse, and maybe they would be more prolific if so. But they have done well here.

This is another plant which needs to be sown indoors, then planted out once all danger of frost is over. They like a well-drained soil, a sheltered spot and plenty of sun, so choose your planting spot carefully. Don't just plant them straight into our clay, but dig in some organic matter before you transplant. We mulched the whole of the garden with horse manure last winter and it has paid off in terms of soil quality this year. You also need to give each plant plenty of space. It's hard to imagine when you transplant your tiny seedling but they will grow quickly into this 1.6m high, spreading plants. 

The stems are quite slim and green as well, so you will need to give them a cane support as they grow - another reason for not putting them in too exposed a place. But make sure you plant at least two reasonably close together -these plants do not self-pollinate and need another tomatillo nearby to ensure pollination, Without pollination, there will be no fruit.


Protect the seedlings from slugs when you first plant them out - once they're established and bigger the slugs find them less tasty. Once you have ensured the plants have support you can pretty much leave them to their own devices. They don't need huge amounts of regular water like tomatoes - in fact they don't like sitting in the wet at all and here in London with our clay soil we probably don't have soil as well-drained as the tomatillo would like.

The flowers should come in June and July and then in August you'll see the first husks forming. If you pinch the young husks you'll feel the developing fruit, about the size of a pea at first, but swelling quickly into the size of a big gobstopper, or eyeball. Once the husk starts to turn pale and split, the fruit is ready to pick. Leave them too long and they'll start falling off the plant.

Tomatillos aren't eaten raw but lightly cooked - either simmered or roasted - to form the basis of a Mexican salsa or green sauce. They're also superb in chutneys. The tase is one of zingy freshness - halfway, say, between a tomato and a cucumber.
Saving seeds: we'll be saving seeds from the tomatillos this year, so that we can sow our own seeds again next spring. This is a fairly simple process - and remember if it's just for you, you don't need so very many seeds.

Choose two to three good-sized, healthy-looking fruits to save and leave them on the plant after you've harvested the rest. Don't let them get frosted - if there is frost forecast, cut the fruit at the stem, leaving a length of stem and bring into the house to finish maturing.

After about a week, the fruit may look past its eating best, but the seeds should be ripe. Break open the tomatillo - you can cut it with the knife, the seeds are tiny and hard and quite tough. Put the tomatillo pieces in a bowl with some cold water, then mash up the fruit. Either use the handle of a knife as though you were crushing a clove of garlic, or rub the tomatillo pieces with your fingers until the seeds start to separate from the flesh, keeping the fruit underwater. You can also put the resulting mush in a fine sieve - not a colander or you'll lose all your seeds. Rinse well with cold water, again rubbing the flesh with your fingers to loosen the fibres and flush out the seeds. 

Repeat until the seeds are well separated from the fruit. Put the remaining flesh and seeds back into the bowl and cover with water again. The heavy seeds -the good seeds - will sink to the bottom. The light seeds - which are not viable - and fibres will rise to the top. Leave the bowl alone while the seeds settle, then pour off the surface flesh and seeds, leaving you with just the good ones.

You may find the seeds come away nice and easily just mashing with your hands, or you may have to repeat the process above once or twice to get the seeds really clean and free of fibrous material. Once you have clean wet seeds, lay them on a tea towel to get the excess water off, then finish drying them on a flat glass or stone surface. Don't be tempted to try kitchen paper, or leave them on tea towel, or even a porous material like wood. The seeds are very sticky and will glue themselves to anything remotely absorbent. Also, let them dry at room temperature - don't be tempted to try to speed up the process in an oven, or in the sun.

Once the seeds are completely dry, tip them into a sealable paper bag or envelope and label them clearly with the name of the vegetable and the date. This last is very important! Keep them in the dark, somewhere cool and dry. They should keep for up to three years.

PS: should you not have a garden, this year Riverford Organics have been growing tomatillos and you can request to add them to your box. 

Monday, 1 October 2012

The vine and the choke


Globe artichokes are basically big thistles. They're not related to the Jerusalem artichoke, which is a type of sunflower. They are, however, related to cardoons, another big thistle which is grown for its leaves. Globe artichokes contain the active ingredient cynara – this promotes liver and kidney function, which is the main reason why the globe artichoke has a reputation for being good for hangovers.
It also has taste inhibitors which will make everything you eat for a while after eating an artichoke seem sweeter. This is the reason why artichokes are difficult to pair with wine.

The part of the artichoke that we eat is actually the flowerbud. Once the bud has opened and is in flower the bloom is spectacular, but now inedible. You want to cut your artichoke when the bud is plump and firm, and the leaf scales are still packed tightly around the heart. You can pick them when small and cook as baby artichokes - when the choke is soft and undeveloped and can be eaten whole - or leave them to grow bigger so you can eat them in traditional style, pulling off each fleshy leaf before lifting off the hairy part of the choke and dipping the rest in dressing.

Globe artichokes are notoriously hard to overwinter. Seed-raised plants are particularly prone to dying in winter, while some varieties simply aren’t hardy and since you can’t bring them indoors you will need to protect them, usually with straw which will also keep off a lot of the wet. The last couple of winters when we’ve had lots of frost and snow in London have been hard on artichokes.

Even the hardier varieties may give up the ghost over winter – not necessarily because of the cold but because globe artichokes don’t like sitting in waterlogged soil.

Many if not most of the world’s globe artichoke plants are in California or France – lots of them in Brittany, but also further south, in a climate warmer and drier than ours in the UK. It’s worth protecting the plants to keep them going because they don’t always flower in their first year and  winter survivors flower more prolifically in year two than they may have done in year one.

Assuming you’ve covered the plants with straw or fleece and they’ve bounced back up green in spring, the good news is that established plants are tough customers. They’ll grow big, look spectacular and give you lots of flowerbuds which are delicious to the point of being addictive.

Starting off, though, you can either grow from seed, buy young plants, or divide up older plants to produce smaller new ones.
Seeds need more cosseting and are less reliable. Young plants are convenient but an expensive way to grow. Division is great, but requires you to know someone who is preparing to perform surgery on their plants – and you’ll get no choice over the variety.

If growing from seed, start by sowing indoors in March, then plant out after the last frost. In London you should be safe in April, but keep an eye on the weather forecast and some fleece handy. But if you get warm weather in April, as we quite often do, they’ll get off to a good start. This last season (2012) the winter survivors got off to a great start in March when we had two weeks of weather that was almost like summer. The new seedlings, however, which went out in April, all had a terrible time when it turned cold and we had the wettest April on record – followed, I think, by the wettest June (remember they don’t like sitting in the wet).

If you buy young plants, they will come in small plugs. Plant out again in April and look out for late frosts.

Artichokes are hungry plants so before you transplant them, get lots of good rotted organic matter into the soil. Really well rotted horse manure is good. Really well rotted kitchen compost is good. If you’re at all worried your soil isn’t quite up to scratch buy some liquid seaweed extract and give the ground a good soaking with that. This is also brilliant stuff for foliar feeds – basically you dilute the seaweed extract and drench the plants with it.

With young plants, you will also need to protect against slugs and snails. Once these spiky prickly leaves have developed they’ll stop being a problem, but the soft succulent new leaves are exactly what slugs and snails like. I use copper rings, placed around each plant. They can be removed once the plant is established and the mature leaves appear. Copper rings are effective because the copper reacts with the mucus on the underside of the slug/snail body and they dislike travelling across it. Make sure you don’t trap any beasties inside the copper ring – or they won’t be able to get out.

If you’re lucky, you should see your first flowerbud form, at the top of the main stem, in late May or June. Pick this as soon as it reaches a manageable size, because, 1) it’s delicious, and 2) cutting the main flowerbud will encourage side buds to form – which means you get more artichokes to eat.

Generally I find that I’ll get a batch of artichokes in June/July and then they’ll go quiet before producing another batch in September/October. Your plant may flower differently.

Once established, artichoke plants can be left alone to get on with it once you’ve successfully nursed them beyond the seedling stage, but there are a couple of things to look out for:


1. Watering. I try not to water established artichoke plants. Here in London the soil tends towards heavy clay even with organic matter dug in and drainage can be variable. Now what artichoke plants will do is send down long roots and eventually a long-lived healthy plant will have roots deep enough to find moisture in the soil.

But if the weather is very dry, better to mulch around the plants rather than water. I have also successfully grown artichoke plants through plastic, which of course retains moisture in the ground by preventing evaporation and also keeps the rain off, so the soil doesn’t get waterlogged.

2. Aphids and ants. Once the slugs stop finding the plants attractive, the blackfly moves in. How badly your artichokes are affected really depends on how prevalent blackfly is in your area. On an allotment site, you can probably count on an infestation, although on my allotment I have blackfly on some artichokes and others which are quite free of it. Here in the Secret Garden we have none at all.

You don’t want to be spraying your flowerbuds, but one quite effective way to get rid of them is to get your garden hose and nozzle, turn it to 'jet', or it smost powerful setting and blast the blackfly off. You may have to do this more than once, but you will eliminate them eventually.

If you get a bad attack, you may also find your plants become riddled with ants. This is not coincidence, although the ants aren’t preying on the blackfly, they’re farming them. Aphids suck in the sugars in the plants cells and then secrete a sticky sweet substance called honeydew – you can see it and feel it on an affected plant. Ants are always attracted to sugar and they come to eat the honeydew. They will protect their aphids from predators, indeed they will even ‘milk’ them by stroking the aphids to stimulate them into excreting more honeydew. They have been known to move the aphids from one plant to another if the first plant becomes sickly.

None of this does the artichoke plant any good. It looks unattractive, it loses sugars to the aphids and the honeydew blocks up the plant pores. If you can identify where the ants are coming from you can try destroying the nest; otherwise persevere with the jet-blasting. If you get rid of the aphids and their sweet secretions, the ants will lose the motivation to invade your artichoke plants. 


Growing grapevines
Some vines are meant to be grown indoors, some are happy outdoors. When grown outdoors here in London, a south or west-facing aspect is best and against a wall rather than a fence – the wall will be slightly warmer – is even better. Take time to determine the best planting position: grapevines can live for up to 100 years. Before you plant your vine, try to imagine which part of your garden is most like France!

If you are planning to make your own wine from your own home-grown grapes, go and buy a vineyard. Or accept that you will get a few bottles at most. Better, really, in a domestic garden, to grow for dessert grapes from which you can get a good crop.

The key is to spend some time on soil preparation before planting. The soil should be dug as far down as you can get, and lots of well-rotted farmyard manure incorporated into it. In the wild, vines were historically forest plants: their roots planted in the cool of the woodland floor, and the stems climbing through and around the branches to reach sunlight. So as well as manure, try mulching your newly-planted vine with leaf mould to remind it of the forests of long ago - leaf mould is always good for your soil structure too.

Alternatively you can help to keep the roots cool by surrounding the bottom of the stem with large stones or rocks, as you do with clematis, another climbing woodland plant, if you think the planting site is too exposed.

You can just buy a grapevine and leave it. In the right place it will grow vigorously and provide lots of foliage, wall/fence/pergola cover, and leaves for making homemade dolmades. But in order to maximise its fruit production you will need to train it.

Vine training
Buy your vine in either autumn or spring. It will look like a rather unpromising stick. Before you plant it, drive in a sturdy stake that will form the support for your growing vine in its first year. Then plant the vine in the prepared planting hole, refill, and firm.

In the first year, the main stem of the vine will grow. Keep this on the straight and narrow by loosely tying it to the stake. Use a soft tie rather than plastic wire.

In autumn, you can start training. You are aiming for a cordon effect, where strong lateral branches grow horizontally at  right angles and at regular intervals, like a espalier apple tree. Once trained the vine will be balanced on either side, with the  lateral branches receiving maximum available sunlight to encourage the plant to produce plenty of fruit.

Remove all the existing lateral stems, and cut the main stem back down to the healthy wood. Tie it in again using a soft tie.
Be ruthless about pruning out weaker stems – you will not kill the vine.

There are lots of grapevine pruning guides on the web but the basic method is the same. This is one of the clearest and easiest to follow.  

The next year, you’ll have many more side-shoots. Prune the main stem back but as before but also choose two lateral shoots to train horizontally and along a fruiting wire, pegged into the back fence or wall. The next year, you can let shoots from the laterals grow on. Prune away everything else.

After three years you’ll have a hardy grapevine and should get grapes which get plenty of light and sun to ripen.

Harvesting vine leaves 
As well as growing vines for grapes, don't forget that the leaves can also be eaten, wrapped around a rice filling as in dolmades, for example.

  • Pick leaves in spring when the leaves are young, tender and pale green.
  • Pick reasonably sized leaves, big enough to wrap around a filling.
  • Pick whole leaves, nothing damaged or with holes in them.
  • Be 100% sure that they have not been sprayed with any pesticide/fungicide/pesticide.
  • Be 100% sure that they are grapevine leaves and not the next plant along.

They need to be blanched before you can use them. Rinse under the tap to make sure you get rid of dust, dirt or even any little creepy crawlies.

Lay the leaves in a bowl or a wide shallow dish like a lasagne dish. Pour boiling water over them and leave them for three minutes, a bit longer if they weren’t quite so young and tender after all. They can now be used but you can also freeze them for use later in the year.

To freeze grape leaves they must be dry. You can dry them very carefully after the first rinse, then lay them one on top of another and slide them into a plastic bag. Seal and freeze. They’ll keep for six months and after three months may not need to be blanched before use.

Or dry them thoroughly after blanching, then freeze as before. Use within a couple of months.

For more on preparing and using vine leaves, see MsMarmiteLover's comprehensive blog post here.